Data importing is a SiteAudit feature available since version 1.6.
Feature Description
The Data Importing feature makes it possible to import discovery and/or provisioning data into a SiteAudit database using an XML document that describes the data to import.
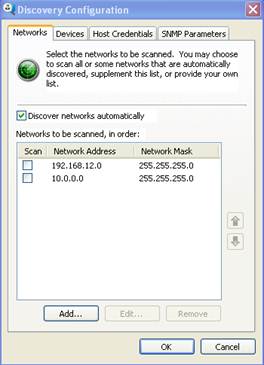
Discovery
Discovery allows inclusion or exclusion of the following:
- Networks
- IP network ranges
- Device
Inclusion only:
Provisioning
You can import the following asset information for any printer that has been discovered:
- Serial number
- Location
- Contact
- Asset tag
- Manufacturer
- Model
- Product number
- Printer name
- Acquired on
- Installed on
(To see asset information for a selected printer, click Printer Details on the View menu, and click the Asset Information tab.)
To import provisioning data for a printer, you must know one of these attributes: serial number, IP address, or MAC address.
Benefits of Importing Data
The capability to import data reduces the deployment time and saves labor costs for some medium and all large environments.
Discovery Data
1. For large deployments with numerous networks and/or IP ranges
Provisioning Data
1. Add location information prior to using SiteAudit Printer Assignment allows printers to be quickly assigned to their respective location or department
2. Add acquired and installed information to track warranty and end of life analysis
Import Procedure
The XML import document containing the desired import data must be created prior to importing data into SiteAudit. A sample import document, SiteAuditImport.xml, is installed in the SiteAudit root folder. This document can be copied and modified to import data for a specific environment.
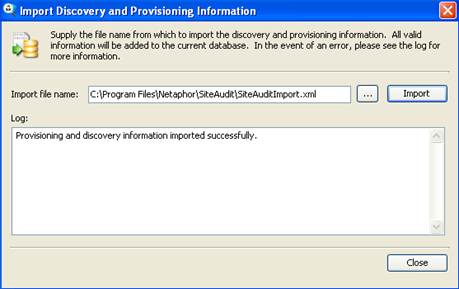
To import data into a SiteAudit database, launch the Import Discovery and Provisioning Information dialog by selecting Import… from the Tools menu.
- Click the
 button to navigate and select the import document.
- Click the Import button to start the import.
Once the import process completes, a popup dialog appears and indicates if the import process succeeded or if errors occurred. The Log: text area will indicate which import data was imported and which sections were not found.
XML File Format - Samples
The XML samples below illustrate how to import data into SiteAudit. More examples can be found in the SiteAuditImport.xml document that is installed in the SiteAudit installation directory Samples\en.
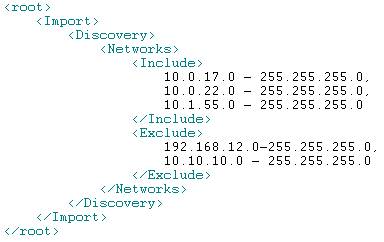
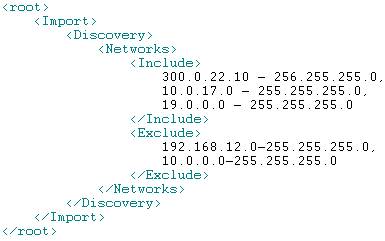
Discovery Example: Importing networks
Both included and excluded networks can be imported. Each network must be separated by a comma and the subnet mask must be separated from the network with a dash. If an error is detected in the IP address or subnet mask, then the entire group (include or exclude) is ignored.
|
Both Include and Exclude contain valid entries, therefore, all entries are appended to the network scan list
|

|
|
300.0.22.10 is an invalid IP address; therefore, only excluded networks are appended to the network scan list
|
|
Discovery Example: Importing device ranges
Both included and excluded device ranges can be imported. A dash must exist between the lower and upper device address. Each device range must be separated by a comma. If an error is detected in an IP address, then the entire group (include or exclude) is ignored.
|
Both Include and Exclude contain valid entries, thus both sections are imported
|
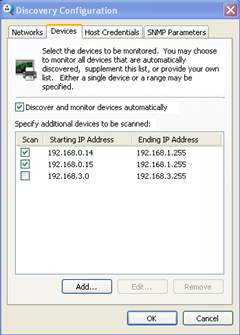
|
|
An error exists in the Exclude range. Device address 256.4.3 is invalid and thus the entire Exclude range is ignored

|
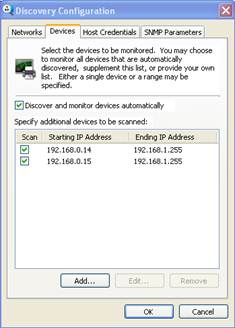
|
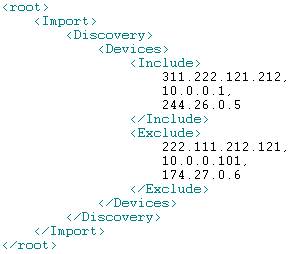
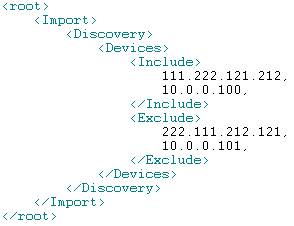
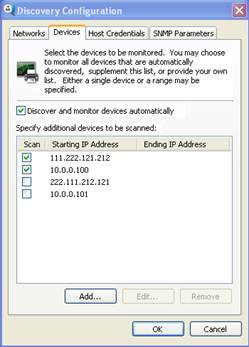
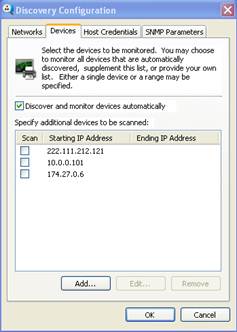
Discovery Example: Importing devices
Devices can be imported for discovery inclusion or exclusion. Device IP addresses must be separated by a comma. If an error is detected in an IP address, then the entire group (include or exclude) is ignored.
|
Valid set of IP address. All data is imported
|
 <!--[endif]--> <!--[endif]-->
|
|
The IP address, 311.222.121.212, is invalid, thus the Include devices are ignored and only excluded devices are imported
|
|
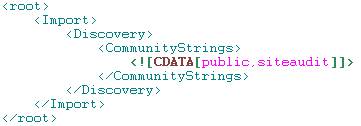
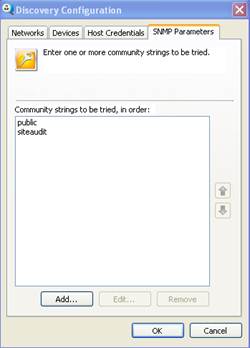
Discovery Example: Importing community strings
Imported community strings will replace all existing community strings. Each community name must be separated by a comma. Since community strings can contain spaces, it is important to not insert spaces between the community names. All community names must be wrapped inside a CDATA section.
|
Imported community strings replace all existing community strings
|
|
Provisioning: Importing printer data
The following printer data can be imported into the SiteAudit database such as, the printer name, asset tag, serial number, product number, location, acquired date and installed date. Printer data can be updated by importing the desired data for devices that have already been discovered by SiteAudit. In order to update a printer’s data, one of the following three things must be known about the printer, either: MAC address, IP address, or the printer serial number. In order to import data for direct-connect printers, one must use IP address provisioning and include a tag that specifies the device ID. Typically, the device ID is the same as the Printer Name.
The following examples illustrate how to import data using provisioning.
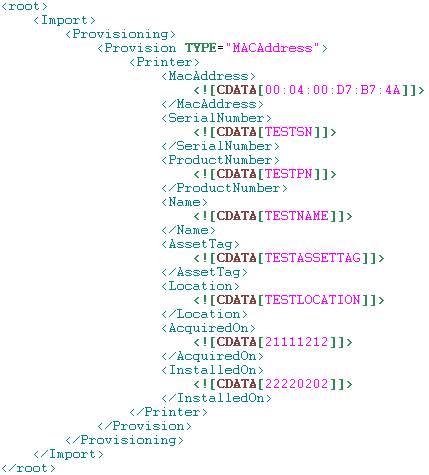
MAC Address Provisioning Example: Importing printer data
The following is an example that illustrates how to import data for a discovered device using MAC Address provisioning. Notice the Provision TYPE must be MACAddress. The first node under the Printer node must be the MacAddress of the printer whose data is targeted for update. All data should be wrapped inside a CDATA section. To import data for more than one printer using MACAddress provisioning, add an additional <Printer> tag , reference the printer MAC address, and add the appropriate tags to import the desired data.
The MacAddress can be separated using colons or dashes for example,
00:04:00:D7:B7:4A or 00-04-00-D7-B7-4A
|
Before Import

|
|
|
|
After Import

|
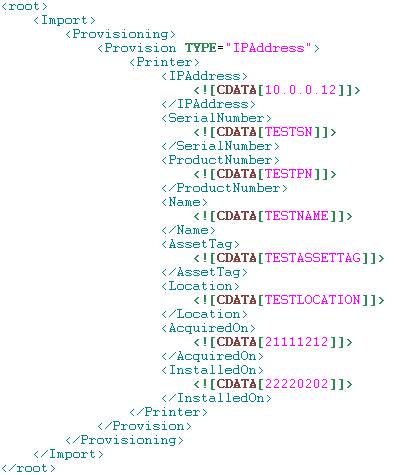
IP Address Provisioning Example: Importing printer data
The following is an example that illustrates how to import data for a discovered device using IP Address provisioning. Notice the Provision TYPE must be IPAddress. The first node under the Printer node must be the IPAddress of the printer whose data is targeted for update. All data should be wrapped inside a CDATA section. To import data for more than one printer using IPAddress provisioning, add an additional <Printer> tag , reference the printer IP address, and add the appropriate tags to import the desired data.
|
Before Import
|
|
|
|
After Import
|
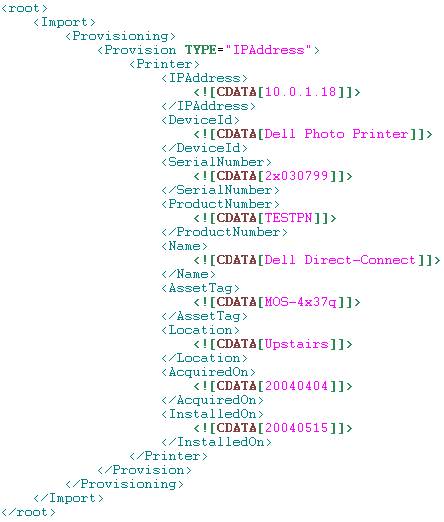
IP Address Provisioning Example #2: Importing data for Direct-Connect devices
The following is an example that illustrates how to import data for a direct-connect device using IP Address provisioning. Notice the Provision TYPE must be IPAddress. The first node under the Printer node must be the IPAddress of the printer whose data is targeted for update. The second node must be the DeviceId of the targeted printer. All data should be wrapped inside a CDATA section. To import data for more than one printer using IPAddress provisioning, add an additional <Printer> tag , reference the printer IP address and device ID, and add the appropriate tags to import the desired data.
|
Before Import

|
|
|
|
After Import

|
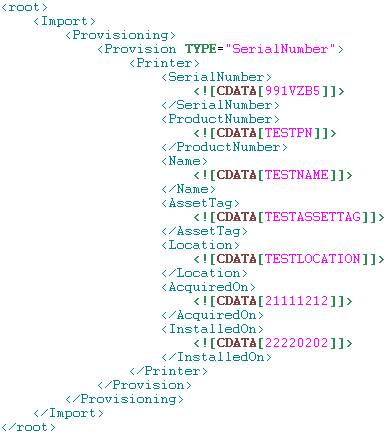
Serial Number Provisioning Example: Importing printer data
The following is an example that illustrates how to import data for a discovered device using serial number provisioning. Notice the Provision TYPE must be SerialNumber. The first node under the Printer node must be the SerialNumber of the printer whose data is targeted for update. All data should be wrapped inside a CDATA section. To import data for more than one printer using SerialNumber provisioning, add an additional <Printer> tag , reference the printer serial number, and add the appropriate tags to import the desired data.
Note: In both MACAddress and IPAddress provisioning, it is possible to update device serial numbers; however, this is not possible when using SerialNumber provisioning.
|
Before Import
|
|
|
|
After Import (note, unlike MACAddress and IPAddress provisioning, the serial number cannot be updated using SerialNumber provisioning

|
Import Sample: Importing data
The following is an example import document
<?xml version="1.0" encoding="utf-8"?>
<root>
<Import>
<Discovery>
<Networks>
<Include>
10.0.17.0 - 255.255.255.0,
10.0.22.0 - 255.255.255.0,
10.1.55.0 - 255.255.255.0
</Include>
<Exclude>
192.168.12.0-255.255.255.0,
10.10.10.0 - 255.255.255.0
</Exclude>
</Networks>
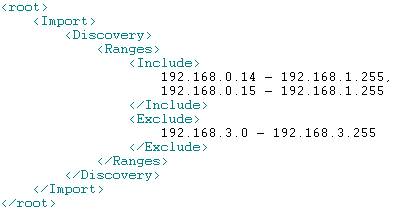
<Ranges>
<Include>
192.168.0.14 - 192.168.1.255,
192.168.0.15 - 192.168.1.255
</Include>
<Exclude>
192.168.3.0 - 192.168.3.255
</Exclude>
</Ranges>
<Devices>
<Include>
111.222.121.212,
10.0.0.100
</Include>
<Exclude>
222.111.212.121,
10.0.0.101
</Exclude>
</Devices>
<CommunityStrings>
<![CDATA[public,siteaudit]]>
</CommunityStrings>
</Discovery>
<Provisioning>
<Provision TYPE="MACAddress">
<Printer>
<MacAddress>
<![CDATA[0F:FE:EE:5A:D4:39]]>
</MacAddress>
<SerialNumber>
<![CDATA[Imported SerialNumber]]>
</SerialNumber>
</ Printer >
<Printer>
<MacAddress>
<![CDATA[00:C0:EE:54:D9:3C]]>
</MacAddress>
<SerialNumber>
<![CDATA[TESTSN]]>
</SerialNumber>
<ProductNumber>
<![CDATA[TESTPN]]>
</ProductNumber>
<Name>
<![CDATA[TESTNAME]]>
</Name>
<AssetTag>
<![CDATA[TESTASSETTAG]]>
</AssetTag>
<Location>
<![CDATA[TESTLOCATION]]>
</Location>
<AcquiredOn>
<![CDATA[21111212]]>
</AcquiredOn>
<InstalledOn>
<![CDATA[22220202]]>
</InstalledOn>
</Printer>
<Printer>
<MacAddress>
<![CDATA[00:44:EB:54:44:45]]>
</MacAddress>
<Name>
<![CDATA[TESTNAME]]>
</Name>
<AssetTag>
<![CDATA[TESTASSETTAG]]>
</AssetTag>
<Location>
<![CDATA[TESTLOCATION]]>
</Location>
</Printer>
</Provision>
<Provision TYPE="IPAddress">
<Printer>
<IPAddress>
<![CDATA[192.168.10.104]]>
</IPAddress>
<SerialNumber>
<![CDATA[Imported SerialNumber]]>
</SerialNumber>
</ Printer >
<Printer>
<IPAddress>
<![CDATA[10.0.0.20]]>
</IPAddress>
<SerialNumber>
<![CDATA[TESTSN]]>
</SerialNumber>
<ProductNumber>
<![CDATA[TESTPN]]>
</ProductNumber>
<Name>
<![CDATA[TESTNAME]]>
</Name>
<AssetTag>
<![CDATA[TESTASSETTAG]]>
</AssetTag>
<Location>
<![CDATA[TESTLOCATION]]>
</Location>
<AcquiredOn>
<![CDATA[21111212]]>
</AcquiredOn>
<InstalledOn>
<![CDATA[22220202]]>
</InstalledOn>
</Printer>
<Printer>
<IPAddress>
<![CDATA[10.0.0.44]]>
</IPAddress>
<AcquiredOn>
<![CDATA[21111212]]>
</AcquiredOn>
<InstalledOn>
<![CDATA[22220202]]>
</InstalledOn>
</Printer>
</Provision>
<Provision TYPE="SerialNumber">
<Printer>
<SerialNumber>
<![CDATA[SerialNumber ABC]]>
</SerialNumber>
<Name>
<![CDATA[ImportedName]]>
</Name>
</ Printer >
<Printer>
<SerialNumber>
<![CDATA[061901628T]]>
</SerialNumber>
<Name>
<![CDATA[TESTNAME]]>
</Name>
<AssetTag>
<![CDATA[TESTASSETTAG]]>
</AssetTag>
<Location>
<![CDATA[TESTLOCATION]]>
</Location>
<AcquiredOn>
<![CDATA[21111212]]>
</AcquiredOn>
<InstalledOn>
<![CDATA[22220202]]>
</InstalledOn>
</Printer>
<Printer>
<SerialNumber>
<![CDATA[LBY03]]>
</SerialNumber>
<Name>
<![CDATA[TESTNAME]]>
</Name>
<AssetTag>
<![CDATA[TESTASSETTAG]]>
</AssetTag>
</Printer>
</Provision>
</Provisioning>
</Import>
</root>
Data Import FAQs
The following list contains frequently asked questions about importing data into SiteAudit.
Q: What happens to imported discovery data?
Discovery data is augmented. No changes are made to existing discovery data. The exception to this rule is for community strings. Imported community strings replace all existing community strings.
Q: What happens if there is an error in the imported data?
An error in an imported network, range, or device data causes the entire set of the include data or the exclude data to be ignored. An error in the include section causes the entire set of include data to be ignored, but the exclude data will be imported if no errors exist in its set.
Q: What happens to imported SNMP community strings?
Imported SNMP community strings replace the existing set of SNMP community strings.
Q: How are SNMP community strings formatted for import?
Community names must be placed inside a CDATA section. Each community name is separated by a comma, with no spaces between the comma and the next community string. I.e. <![CDATA[public,private,mycommunity]]>
Q: How can one be sure that provisioning data is added to the database?
Provisioning data is imported when a printer is found matching the provisioning criteria (e.g. serial number, IP address or MAC address). When such a match exists the current data for that printer is replaced with the imported data.
Q: What happens to provisioning data if is there is more than one match?
If more than one printer matches the provisioning criteria, each will have its current data replaced by the imported error.
Q: What date format should be used for Acquisition and Installed data?
All dates must be specified as YYYYMMDD
Q: Can one import a serial number using SerialNumber provisioning?
No. To import a serial number for a discovered device, use IPAddress or MACAddress provisioning.
Q: Is it possible to change the inclusion or exclusion state of an existing network using the import mechanism?
No. It is only possible to append additional networks to the list of discovered networks. To change the state of a network, from exclusion to inclusion or vice versa, or the order of network discovery, it is necessary to do this from the SiteAudit Discovery Configuration dialog.
Q: Is it possible to change the order of discovered networks via the import mechanism?
No. This must be done through the SiteAudit Discovery Configuration dialog
Q: Will imported networks overwrite existing networks?
No. If a network has been added manually, it is not possible or necessary to add a duplicate entry.
Q: Can data be imported for more than one device using provisioning?
Yes. Simply add another <Printer> node with the appropriate data for each printer. The following example shows how to update data on two printers using MACAddress provisioning; however, the same is possible using IPAddress or SerialNumber provisioning as well.
<Provision TYPE="MACAddress">
<Printer>
<MacAddress>
<![CDATA[00:04:00:D7:B7:4A]]>
</MacAddress>
<SerialNumber>
<![CDATA[imported serial number]]>
</SerialNumber>
</Printer>
<Printer>
<MacAddress>
<![CDATA[00:C0:85:2A:C6:CD]]>
</MacAddress>
<Name>
<![CDATA[imported name]]>
</Name>
</Printer>
</Provision>
Q: What format are MAC addresses entered in the import document?
MAC addresses octets can be separated using either a colon or dash as follows:
00:04:23:AC:D7:03 or 00-04-23-AC-D7-03
Q: How do I import data for a direct-connect device?
Use IP Address provisioning and include the DeviceId tag with the appropriate information for the printer. The Device ID is a hidden column that can be exposed via the Column Chooser.
<DeviceId>
<![CDATA[hp laserjet 640c]]></DeviceId>
Note: Do not include the DeviceId tag when importing data for network-connected printers.
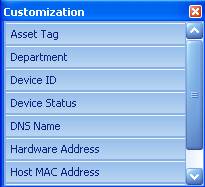
Q: How do I find the Device ID for a printer?
The Device ID can be displayed in a SiteAudit View by right-clicking a column header and selecting Column Chooser from the popup menu and choosing Device ID.