This article explains the discover configuration settings for SiteAudit products and how discovery is used to find devices in your organization. The default discovery settings have changed in version 6.0 and requires that a user configure the discovery criteria before to allow SiteAudit to scan for devices.
Discovery Basics
In order to discover networked printers and Windows host machines (for monitoring direct connect printers, print queues, and the collection of print jobs), discovery information must be configured in SiteAudit. To communicate with these networked devices, it is necessary to enter the SNMP community strings for your devices and the networks, ranges, and/or IP addresses where these devices reside. This document describes how to configure discovery for your environment.
By default, SiteAudit cans approximately 25,000 IP addresses per hour. The speed at which the discovery scan occurs can be increased or decreased via the application settings; however, your network environment will be the ultimate factor is how fast discovery can proceed. Prior to making any changes to the default settings, it is recommended to discuss your options with Netaphor support and your IT administrator.
It is important to note that once SiteAudit discovers a device, it remains in the database and is monitored automatically unless it is specifically excluded from monitoring via the Discovery Configuration > Devices tab. Therefore, it is recommended that one identify the portions of the network that should be scanned and the areas that are not to be scanned and configure discovery accordingly.
Once you've identified your discovery criteria as described in the article, SiteAudit Monitor & Viewer Deployment Checklist, then it is time to configure SiteAudit discovery. With SiteAudit, it is possible to define networks, ranges, individual IP addresses for discovery or a combination of these. It is also possible to indicate specific networks, ranges, or IP addresses that you do not want to scan (or exclude). For optimal efficiency, it is best to discovery and monitor only the addresses where networked printers and Windows host machines reside although this may not always be possible.
Inclusions vs. Exclusions
It is possible to define areas of the network that you want SiteAudit to scan and monitor (inclusions) and those areas where you do not want SiteAudit to scan and monitor (exclusions). Excluded networks, ranges, and addresses take precedence over those that are included. The following example should help to clarify this point.
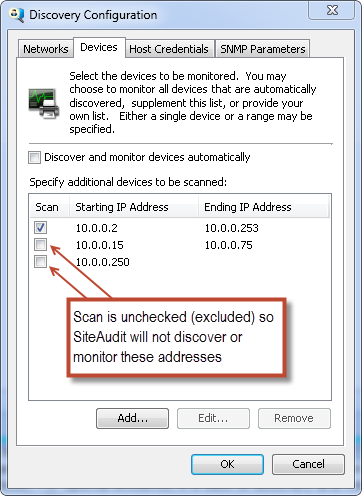
In the Device settings above, the address range 10.0.0.2 - 10.0.0.253 is checked to Scan indicating that SiteAudit should scan this range for devices and monitor any that it finds. There are two entries where Scan is not checked. This means that SiteAudit should not scan or monitor this range 10.0.0.15 - 10.0.0.75 and this IP address 10.0.0.250. So even though this range and IP address exist within 10.0.0.2 - 10.0.0.253, they are excluded. Since exclusions take precedent, these will not be scanned or monitored.
In the case where SiteAudit has already scanned and discovered a device and you no longer want SiteAudit to monitor it, you can simply add the IP address to the Devices tab and clear the Scan check box.
The diagnostic view, Discovery Progress, shows the current state of discovery and when it was last run. By default, discovery is run every 7 days. This can be increased or decreased via the Tools > Application Settings. Before changing this setting, it is recommended to examine Discovery Progress and confer with Netaphor support.
Importing Discovery Information
It is possible to import all discovery information except for Host Credentials. Refer to the discovery import articles on this site for more information about how to import discovery data.
Discovery Configuration
This section explains the Discovery Configuration settings and provides guidance for configuring discovery in your environment.
Networks
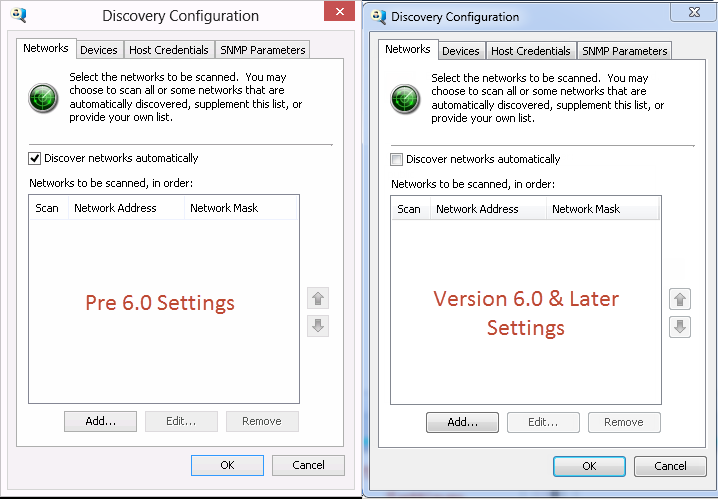
In the Networks tab, one can configure which networks SiteAudit scans for devices. In version 5.5 and older, the Discover networks automatically check box is selected by default. In version 6.0 and later, it is not selected by default. When this setting is selected, SiteAudit can discover new networks and scan them for printers and Windows host machines.
Networks can be included or excluded for discovery via this dialog. It is important to try to minimize the IP addresses that are scanned and monitored to the areas where printers and Windows host machines (if monitoring direct connect printers) are known to reside for best efficiency and performance. It is recommended that one not include Class A networks for discovery as there are over 16 million IP addresses in a Class A network.
Note that if no ranges or addresses are configured for discovery on the Devices tab or if Discover and monitor devices automatically is not checked, then no networks will be discovered.
If Discover networks automatically is selected, it is important to examine which networks SiteAudit discovers and confirm they should be scanned. If SiteAudit discovers networks on which you do not want it to scan, clear the Scan check box.
It is also worth noting:
- The network information is obtained via SNMP from the routers
- The routers must implement or allow discovery of other networks
- A community string that allows access to the router must be included in the SNMP Parameters tab
In many enterprise environments, access to routers is not permitted and applications cannot discover networks in these environments
Adding a Network
To add a network, simply click the Add... button and enter the network and subnet mask. It is recommended to not include class A networks as these contain over 16 million IP addresses. Depending on the network speed and sparseness, it could take many days or weeks to complete a scan of this size.
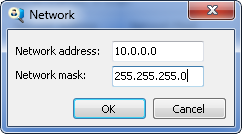
Once the network has been added, the Scan check box can be cleared if the network is not to be scanned for new devices.
A network can be deleted by selecting it and clicking the Remove button.
Devices
The Devices tab is perhaps the most important tab for configuring your discovery criteria. Quite often, the IT department maintains a list of IP addresses and the associated network devices. If possible, obtain the list of IP addresses and/or ranges for the networked printers and include these in this tab.
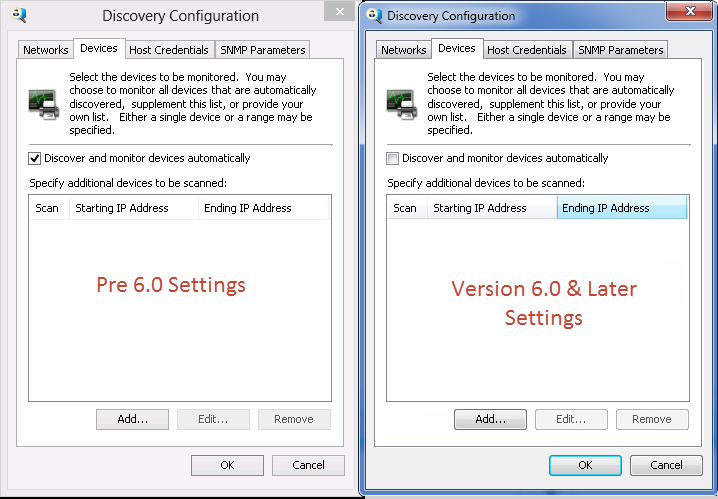
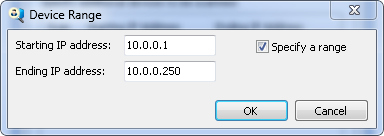
Adding a Range or IP Address
To add a range or IP address, simply click the Add... button and enter the IP address.
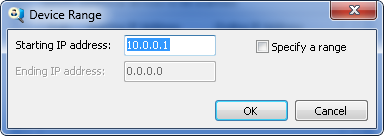
If you want to add a range, select Specify a range and enter the last address in the range
Once the address has been added, you can clear the Scan check box if SiteAudit should not discover or monitor the range or IP address specified.
To delete the IP address or range, simply select it and click the Delete button.
It is important to note that SiteAudit monitors all devices that have been discovered. Deleting an IP address or range will not prevent SiteAudit from monitoring devices that have been discovered. Unless specifically excluded from monitoring, SiteAudit monitors all devices that have been discovered.
The following example shows a network range to scan, one range and one address that are excluded.
Host Credentials
The Host Credentials tab is used for discovery of direct connect printers and the collection of print jobs. SiteAudit must communicate with Windows host machines in order to establish if a printer is attached and collect data from it. In addition, SiteAudit can collect information from print queues for networked printers that have been discovered. Additionally, job data can be obtained from the Windows host.
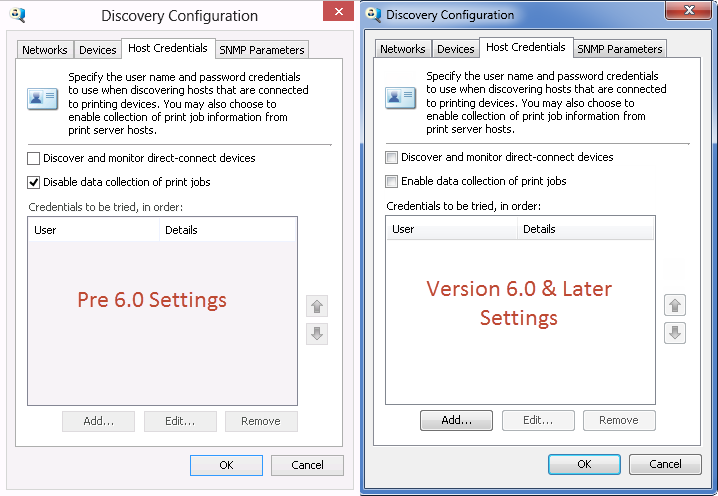
To discover Windows Host machines and subsequently monitor attached direct connect printers, it is necessary to
- Check Discover and monitor direct-connect devices
- Enter the local administrator credentials of the Windows host machine(s)
To collect print jobs from Windows host machines, it is necessary to
- Check Enable data collection of print jobs
- Enter the local administrator credentials of the Windows host machine(s)
SNMP Parameters
SNMP Parameters are the community strings SiteAudit uses to communicate with networked devices. The image on the left show the default community strings in versions 5.5 and prior. The image on the right shows the default community string for version 6 and later.
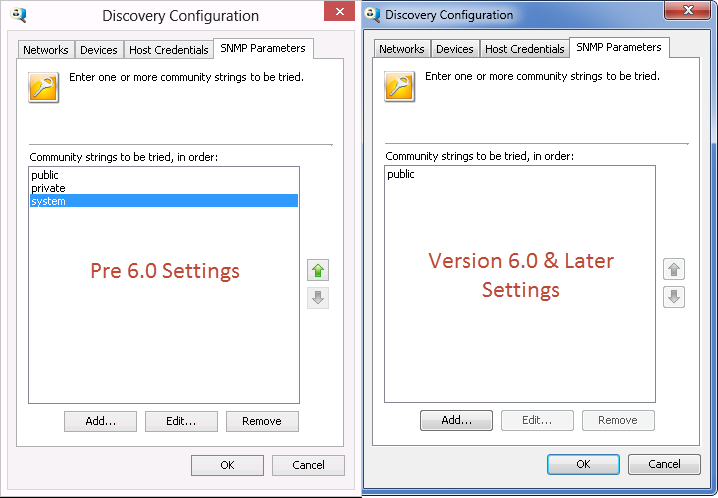
By default, most network devices have the default SNMP read community string public. In many cases, IT department personnel may choose to change the community string from this default value. Typically, all networked devices are configured to use the same community string. However, some organizations may use a different community string for some devices to limit access. In order for SiteAudit to discover a networked printer or Windows host machine, the community string(s) must be entered into the SNMP Parameter dialog.
If multiple community strings are used, it is advised to order them according to which is used most using the arrow keys.
Community strings are case sensitive! Be sure that community strings entered into the SNMP Paramaters dialog match the community strings in your environment. It is advised to use as few community strings as are necessary to communicate with your devices. The use of one community string is optimal.
SiteAudit is a read-only application and cannot set or change information on networked devices.

