Publishing Views
This document is a guide to publishing the 14 views available in Netaphor SiteAudit™.
With SiteAudit, you can create reports from any SiteAudit view and publish these reports to a
web site. Users can then view the reports through a Web browser. It is
possible to create thousands of customized reports using any of the views available in SiteAudit.
Contents
Feature Overview
The Netaphor SiteAudit™ Reporting Web Site (RWS) is a new feature available since SiteAudit 4.0 that allows users to obtain SiteAudit reports over an intranet or the Internet. The RWS is an ASPX site that runs on Microsoft IIS 6 or later. Authorized users can publish reports to the RWS directly from the SiteAudit Viewer. The reports can then be accessed over the Web using Internet Explorer 7 or later. Other key web report features:
- Installs with 70+ sample Web reports
- New reports can be created from SiteAudit filtered views
- Web site reports folders may be restricted from access with IIS credentials
All views in SiteAudit can be customized, saved, and reopened in SiteAudit when desired. A saved view can also be published to the RWS and viewed by users over the Web. This can be very convenient for users who do not have a SiteAudit Viewer or who are traveling and have access only to a Web browser.
Each time a report on the RWS is opened, the report is regenerated so that it contains the most recent information available. Therefore, if the view Time span was configured to show data for "Last Week," every time the report is opened it will contain data for the previous seven days.
Figure 1 shows the default RWS installed with SiteAudit 4.0. The report folders are displayed on the left and all reports in the selected folder are displayed in the table on the right. All reports are available in the following formats:
Selecting HTML opens the report in a new browser window. Selecting one of the other format options prompts the user to open or save the report.
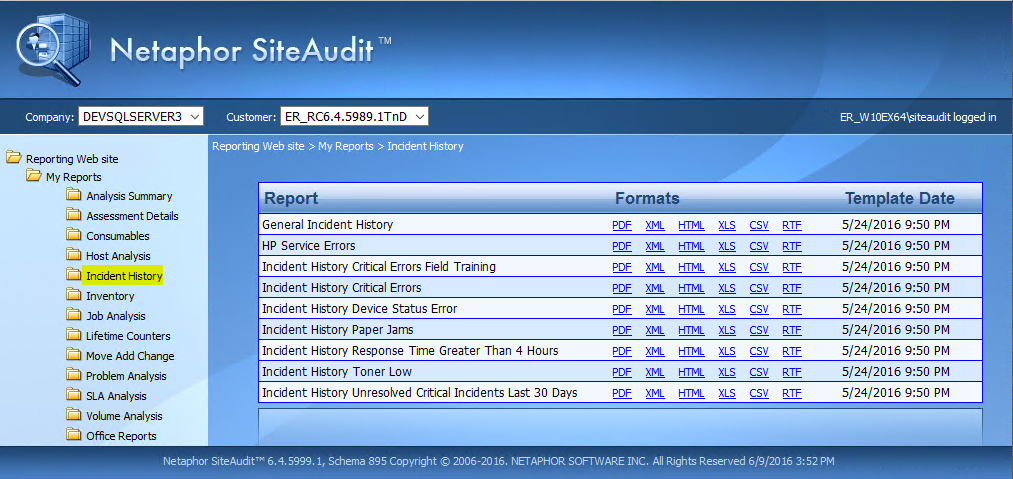
Figure 1 – Default Reporting Web Site
Publishing a SiteAudit View
SiteAudit views can be published to the RWS using the SiteAudit Viewer. Click the menu item Reports > Publish to Web to invoke the "Publish view to web site" dialog shown in Figure 2.
The RWS contains a folder navigation hierarchy on the left and a table on the right that lists all of the reports contained within the selected folder. Figure 1 shows that the MyReports/Inventory folder is selected and six reports are contained in the folder. Each report can be viewed in any one of the available formats (PDF, XML, HTML, XLS, CSV, and RTF). Selecting HTML will open the report as an HTML document in a new browser window. Selecting one of the other format options will invoke the Open or Save dialog to allow the report to be opened immediately using the appropriate program or saved to a desired location.
When publishing a report to the RWS, It is necessary to specify which folder the report should be published to and provide a name for the report, which will be displayed under the Report column in the reports table.
Before publishing it to the RWS, the view from which a report is derived must be saved. The view can then be published by clicking the Reports > Publish to Web menu item, entering the required information into the dialog, and clicking the "Publish" button to publish the report to the web. The remainder of this section explains how to publish reports.
Entering Information In the Publish View to Web Site Dialog
This section describes what information must be entered in the "Publish view to web site" dialog in order to publish a view to the Reporting Web site.
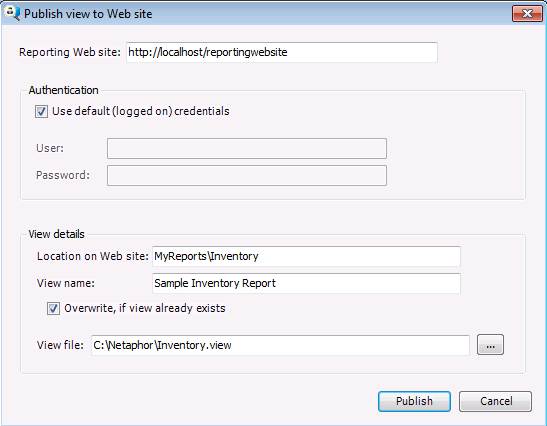
Figure 2 – The Publish View to Web Site Dialog
Reports Web site
Enter the base URL used to access the RWS (including the port number if required). If the RWS is located on the same machine from which a user is publishing, then the default URL should be: http://localhost/reportingwebsite. If publishing to a remote site, then use either the IP address or DNS name of the server such as, http://myserver/reportingwebsite.
Authentication
To use the same credentials that were used to log onto the machine where the SiteAudit Viewer is installed, select the check box "Use default (logged on) credentials." Alternatively, uncheck this check box and enter the required user name and password. Depending on the IIS security configuration, it may be necessary to include the domain in the user name as shown in the "User" text box in Figure 2.
View Details
The "View Details" section provides a way to specify which view to upload to the website, where to upload the view, and what name will be displayed in the reports table.
Location on Web Site
The "Location on Web Site" section is used to specify where to publish a view. All views must be published into an existing folder on the website. Figure 3 below shows a sample report folder structure. Suppose one wants to publish a report to the Inventory folder. Since the Inventory folder is under the MyReports folder, the correct text to enter into the "Location on Web site" text box is MyReports\Inventory. Note that the website root folder, "Reporting Web site," is not included in the path. To add a report to the root Reporting Web site, leave the "Location on Web site" text box blank.
The folder names that appear in the folder hierarchy as shown in Figure 3 are display names that can contain spaces. However, the actual folder names on the IIS server are not permitted to have spaces in the names. IMPORTANT: when publishing reports, the folder name on the IIS server must be specified in the "Location on Web Site" text box: Do not use the folder display name.
View Name
Enter the report display name in the View name text box. This name is displayed in the Reporting Web site report table when the file is published.
View File
Enter the full path and name of the view file to publish or click the "..." button to select which view to publish.
Overwrite
Check the "Overwrite if view already exists" check box to overwrite existing reports.
Success and Failure Messages
The following figures show publish success and failure messages:
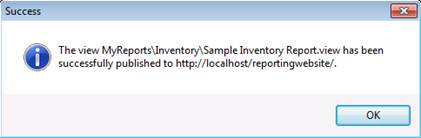
Figure 3 – Publish Success Message
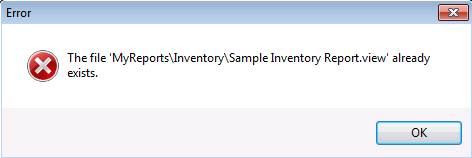
Figure 4 - Error indicating that the report already exists in the specified location.
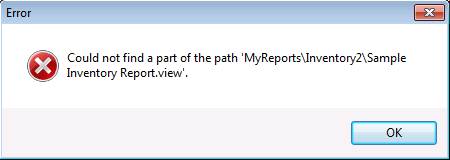
Figure 5 - Error indicating that the specified path to the Reporting Web site folder could not be found.
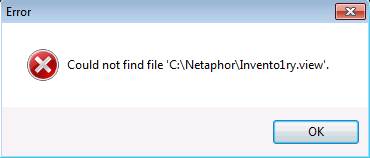
Figure 6 - Error indicating that the specified report could not be found.
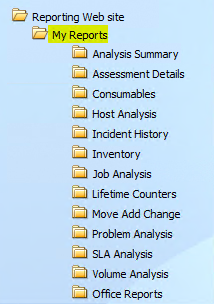
Figure 7 – Reporting Web Site Folder Hierarchy
Reducing Report Size and Download Time
SiteAudit reports can be small and simple or very large and complex. Some SiteAudit databases are huge. If this is the case, it may take several minutes or an hour or more to generate and download the report.
The information in a report can be reduced by selecting an appropriate Time span other than All. For instance, if you are only interested in data that has been collected over the past month, then set the Time span to "This month." This will limit the report data to data that was collected during the current month.
Another way to minimize the amount of data included in a report is to choose a department. Only data from the chosen department will be included in the report.
Choosing a department and selecting an appropriate time span will greatly reduce the time it takes to obtain a report from the Reporting Web site.
Publishing Views on Windows Server 2008
Users are required to have administrator privileges when publishing to a site on a Windows Server 2008 machine.

