Customizing RWS
All Views in Netaphor SiteAudit™ can be customized and published to the Reporting Web site (RWS). This article explains how the RWS can be customized using custom colors, logos and so on.
Contents
Feature Overview
The RWS feature has been available since SiteAudit 4.0. Users can use it to obtain SiteAudit reports over an intranet or the Internet. The RWS is an ASPX site that runs on Microsoft IIS 6 or later. Authorized users can publish reports to the RWS directly from the SiteAudit Viewer and the reports can be accessed over the Web using Internet Explorer 7 or later.
Figure 1 shows an example of the default RWS installed. The RWS contains a folder navigation hierarchy on the left and a table on the right that lists all of the reports contained within the selected folder. Figure 1 shows that the MyReports/Incident History folder is selected and eight reports are contained in the folder. Each report can be viewed in any one of the available formats: PDF, XML, HTML, XLS, CSV and RTF. Selecting HTML will open the report as an HTML document in a new browser window. Selecting one of the other format options will invoke the Open or Save dialog to allow the report to be opened immediately using the appropriate program or saved to a desired location.
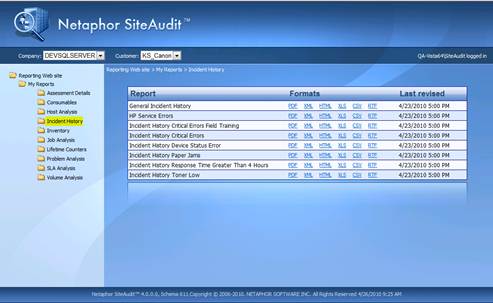
Figure 1: Netaphor SiteAudit RWS
Customizing the RWS
The RWS is an ASPX site that runs on IIS 6 or IIS 7. The RWS is installed with the theme named "default." This theme can be customized as desired to reflect personal taste or company themes. The first step to take when customizing your RWS is to create a new theme.
Creating a New Theme
A new theme can be created easily by copying and pasting the default theme into the App_Themes folder and giving the theme a suitable name. Alternatively, users can back up the default theme and simply modify the original version as desired. Another theme named "sample" is installed with the RWS. The sample theme is simplified and contains background colors instead of images. This theme may be easier for some users to modify. A screenshot of the RWS using the sample theme is shown at the end of this document.
Locate and copy the default theme, which is installed by default into the folder C:\ProgramFiles\Netaphor\SiteAudit\ReportingWebsite\App_Themes\default.
Paste a copy of the default theme folder into App_Themes and give it a new name.
NOTE: Do not insert spaces into the theme name.
Once the new theme has been copied and renamed, then it is time to begin customizing it. The following sections describe how the theme can be customized. Depending on the experience of the person performing the customizations, it is possible to completely redesign the look and feel of the site. However, it is advisable to limit customization to changing the header, footer, logos, fonts and background colors. The following sections describe how to change these.
Specifying a Theme in the Web.configFile
The RWS uses the default theme. Web site administrators can create their own theme to apply to the RWS. The default theme can be modified directly. If it is directly modified, we recommend that it be backed up first. If a theme is created that has a name other than "default," specify the theme name in the web.config file, which is located in the root folder of the web site. Open the web.configfile and locate the following line within appSettings, then replace the theme name with the new theme name. Here's an example:
<add key="DefaultTheme" value="default"/>
For example, if thenew theme is named, MyCompanyTheme,then the line above should be changed to:
<add key="DefaultTheme" value="MyCompanyTheme"/>
Once the change has been made, save the web.config file and the theme will be automatically applied to the RWS.
Theme Components
The theme applies all UI styling for the web site, including graphics, fonts, colors, position information, etc. Site administrators can change the RWS theme as desired. For instance, it might be desirable to change the colors and logo to reflect those of your company.
All themes are located in the RWS App_Themes folder. Figure 2 shows the files that currently exist in the default theme.
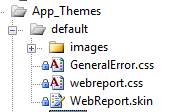
Figure 2: Default Theme for RWS
CSS Stylesheets and Skins
The default theme contains two CSS files and one SKIN file. GeneralError.css is used to style the error page. The error page appears whenever an error occurs on the Web site. The webreport.css is the main style sheet for the RWS and most customization takes place in this file. The WebReport.skin file allows users to set the text that is displayed in the header and footer. It is also possible to set the number of reports shown on a page and to customize the report folder icons.
Changing the Header
The RWS header background, logo and company name are PNG images. Users should change only the logo and company name images. The following sections explain how to change the header.
Changing the Header Background
The RWS header background is an image, but can easily be changed to use a background color instead. If a back ground header image is present in the #pnlHeaderImage selector, remove it. Then add a background-color property to the #pnlHeader selector.
The goal of this section is to change the header appearance from this…

to this:

//Background image for the default theme
background-image: url(../../App_Themes/default/images/header.jpg);
//Header background color set to Brown
#pnlHeader background-color: Brown;
Changing the Company Logo
The company logo can be changed by modifying the background image in the #pnlHeaderImage CSS selector. The default image is specified as follows:
//Header logo for default theme
background-image: url(../../App_Themes/default/images/siteauditicon_trans.png);
Add your new company logo to your theme images folder and specify the path and logo name. The Sample theme contains the logo displayed in the MyCompany Name header shown above.
Changing the Company Name
The company name is an image in the default theme. Users can replace the image with their own company name image or the image can be replaced with text.
The company name can be changed by modifying the background image in the
#pnlHeaderCompanyNameImage CSS selector. The default image is specified as follows:
//Header company name for default theme
background-image: url(../../App_Themes/default/images/netaphor.png);
Add the new company name image to your theme images folder and specify the path and file name. If you prefer to use text instead of an image, simply remove the background-image property specified above. Open the WebReports.skin file and locate the following control that has the the Skin ID Default_lblHeaderText. The example below shows the Default_lblHeaderTextfor the default theme.
<asp:Label runat="server"SkinID="Default_lblHeaderText"Text=""Style="display:none;"></asp:Label>
Remove the Style property and insert the company name into the Text property as shown in the example below.
<asp:Label runat="server" SkinID="Default_lblHeaderText" Text="My Company Name,Inc." ></asp:Label>
For an example of this, see the Sample theme. A screenshot of the Sample theme is shown at the >end of this document.
Changing the Footer
The RWS footer can be changed easily to display whatever text you desire.
The following examples will explain how to change the footer as it exists in the default theme...

to the footer that exists in the Sample theme:

Changing the Footer Text
Locate the text shown below in the sample theme WebReport.skinfile:
<asp:Label runat="server"SkinID="Default_lblFooterText"Text="My Company Name, Inc. Copyright2010. All rights reserved"Visible="True"></asp:Label>
Replace the text highlighted in yellow with your footer text.
Changing the Footer Background
The default theme uses an image for the footer background. In this example, the background image is removed and replaced with the background color (brown).
Locate the #pnlFooter CSS selector and replace the following line:
background-image: url(../../App_Themes/default/images/footer.jpg);
with:
background-color: Brown;
Changing Fonts
The RWS fonts can be changed by locating all instances of font-family or font-size in the webreports.css file and changing them to the desired font family and size.
Changing Background Colors
The RWS default theme uses a combination of background colors and background images. Several background images are placed strategically to appear as one common background. Thus it is not recommended that users attempt to add new background images. Instead, it is better to remove all background images and replace them with a background color. The theme named Sample exists in the App_Themes folder and has had all background images removed and replaced with colors. To view the RWS using the Sample theme, simply modify the theme name in the web.config file as explained previously in the section named SpecifyTheme in the Web.config File. An example of the sample theme is shown at the end of this document in >Figure 3.
The main background color should be applied to the HTML or BODY selector. The following background color is applied to the HTML selector for the RWS:
background-color: #84AEEF;
The background colors and images are specified in the webreport.cssfile located in the root folder of the theme.To change the background colors, search the webreport.css file for the background-image and background-repeat properties and replace them with a background-color property.
For example, the #pnlWrapper selector is used to configure the style for all of the information that exists on the main page of the RWS. A repeater image is assigned to the background and is repeated across the width of the browser. The following two statements should be replaced with one that defines the desired background color:
background-image: url(../../App_Themes/default/images/repeater.jpg);
background-repeat: repeat-x;
The above two lines can be removed and the background color that is applied to the HTML select or will fill the browser window.
Find all instances of background-image and background-repeat and remove them. Add a background-color property to panels where you want to apply a unique color:
background-color: #84AEEF;
Adding a Custom Hyperlink
It is possible to add a custom hyperlink to the RWS page to direct users to a specific site. The RWS allows up to two custom hyperlinks that can be specified to direct users to a particular website. The following information explains how to add a hyperlink to the RWS.
Open the webreports.skin file located in the root folder of your theme and locate the element with the SkinID Default_linkExtra1:
<asp:HyperLinkrunat="server"SkinID="Default_linkExtra1"CssClass="ExtraHyperlink1"NavigateUrl="http://www.netaphor.com"Text="NETAPHORSOFTWARE, INC." Visible="false" />
- Modify the NavigateUrl property to point to the desired website.
- Modify the Text property to display the desired link text on the RWS page
- Change the Visible property to “true”
Open the webreports.css file located in the root folder and locate the element at the end of the file with the CSS class name, ExtraHyperlink1.
The sample style for the image is currently as follows:
.ExtraHyperlink1
{
display: block;
position: absolute;
top: 108px;
left: 450px;
color: Yellow;
text-decoration:none;
}
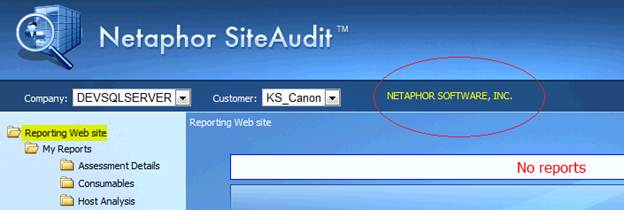
Modify the style and position to display the link as desired. The style specified above will place a yellow hyperlink with the text NETAPHOR SOFTWARE, INC. in the toolbar area of the RWS as shown in the following screen shot.
Adding a Custom Image
It is possible to add custom images to the RWS page. The following information explains how to add an image to the Reporting Web Site.
First, add your custom image/s to the theme/images folder.
Open the webreports.skin file located in the root folder of your theme and locate the element with the SkinID Default_imageExtra1.
<asp:Imagerunat="server"SkinID="Default_imageExtra1"CssClass="ExtraImage1"ImageUrl="~/App_Themes/sample/images/logo.png"Visible="true"/>
- Modify the ImageUrl property to point to the desired image. In the above example, the folder_closed.png image is used. Note the image must be added to your theme/images directory.
- Change the Visible property to “true”
Open the webreports.css file located in the root folder and locate the element at the end of the file with the CSS class name ExtraImage1. Modify the style to position the image in the desired location.
.ExtraImage1
{
display: block;
position: absolute;
top: 10px;
left: 425px;
}
The sample image is absolutely positioned such that it appears in the header as shown below.

Customized RWS
The figure below shows an example of a RWS that has been customized. This customized theme is included in the installation of the RWS and is named "sample." Users can backup and modify the sample theme instead of using the default theme to construct a custom theme.
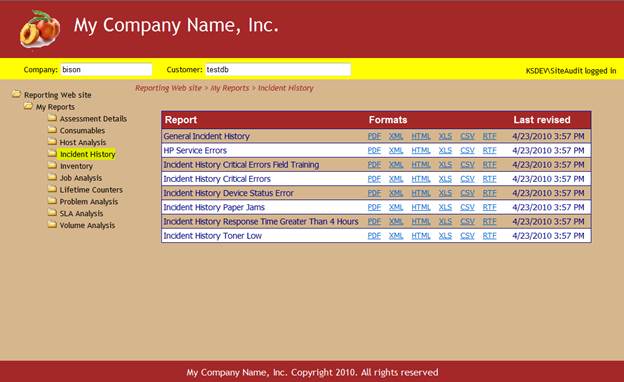
Figure 3: Sample of Customized RWS

