| |
| |
Deployment Guide
| Reference Number: AA-00225 Views: 2103 Last Updated: 08-30-2023 03:20 PM |
0 Rating/ Voters
|
 |
SiteAudit OnSite Deployment Guide
This document explains how to configure Netaphor SiteAudit™ deploy SiteAudit in your environment, which includes installation of the software and discovery configuration.
Contents
Introduction
SiteAudit is an asset management tool used to measure and report printer asset use, service and costs. SiteAudit does the following:
- Reports the number of incidents and notifications
- Provides a very rough benchmark for calculating your memory requirements: With 2,000 active printers and 220,000 incidents over four months, the total memory SiteAudit uses is 1GB. Over a year, the total memory used is 3GB to 5GB.
Glossary
-
Networks: The networks that SiteAudit scans for devices
-
Devices: The IP ranges and individual IP addresses that SiteAudit monitors. "Discover and monitor devices automatically" can be selected to scan the local network and monitor devices automatically. This is recommended for small networks only. Individual IP addresses and ranges of IP addresses can be disabled to prevent monitoring by creating an entry and clearing the Scan checkbox.
-
Host Credentials: Credentials are required to scan Windows machines for locally connected printers and to collect print job data. Credentials entered must have administrator privileges on the machines that are scanned. All Windows machines defined in Networks or Devices are scanned using these credentials. The credentials must include the domain or machine, the username and a password. It is possible to use the domain administrator account which typically has access administrator privileges on all machines. Otherwise, it is recommended to use a single service account that has local administrator access on all Windows machines that have locally attached printers. SiteAudit encrypts all passwords on the machine where the DCA runs. Enable discovery and monitoring of directly connected printers or collection of print jobs by enabling the checkbox for these options.
-
SNMP Parameters: Community strings to be used for remote access to devices by SNMP. It is recommended to use as few community strings as needed and to order them by placing the most used community string at the top of the list.
-
SNMPV3 Configuration: User profiles to be used to discover and monitor devices that are configured to use SNMPv3. It is recommended to use as few SNMPv3 profiles as needed and to order them by placing the most used profile at the top of the list.
Installation of SiteAudit on a server or workstation requires a local account running as a service.
The following assumes that Microsoft .NET Framework 4.8 is already installed. If it is not, install the prerequisites first, which are available at the same location as the SiteAudit installation. It is recommended to install the latest Windows updates
See the Installing SiteAudit OnSite article that describes how to install the SiteAudit OnSite product in your environment.
Discovery Tasks
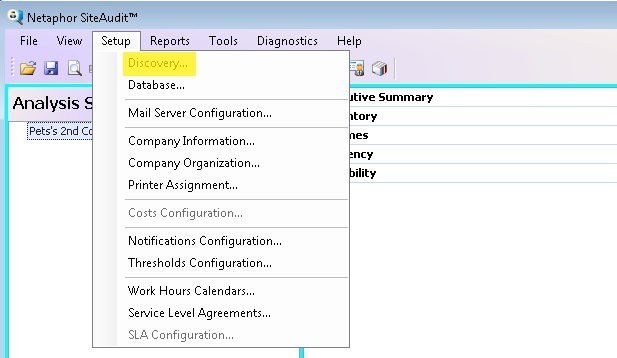
The following table gets you started with discovery tasks. Sections that follow the table provide details about key aspects of discovery. You can find the Discovery Configuration dialog box under Setup (see photo).
|
Discovery Task
|
What you need to do
|
|
|
|
|
Scan specified networks only
|
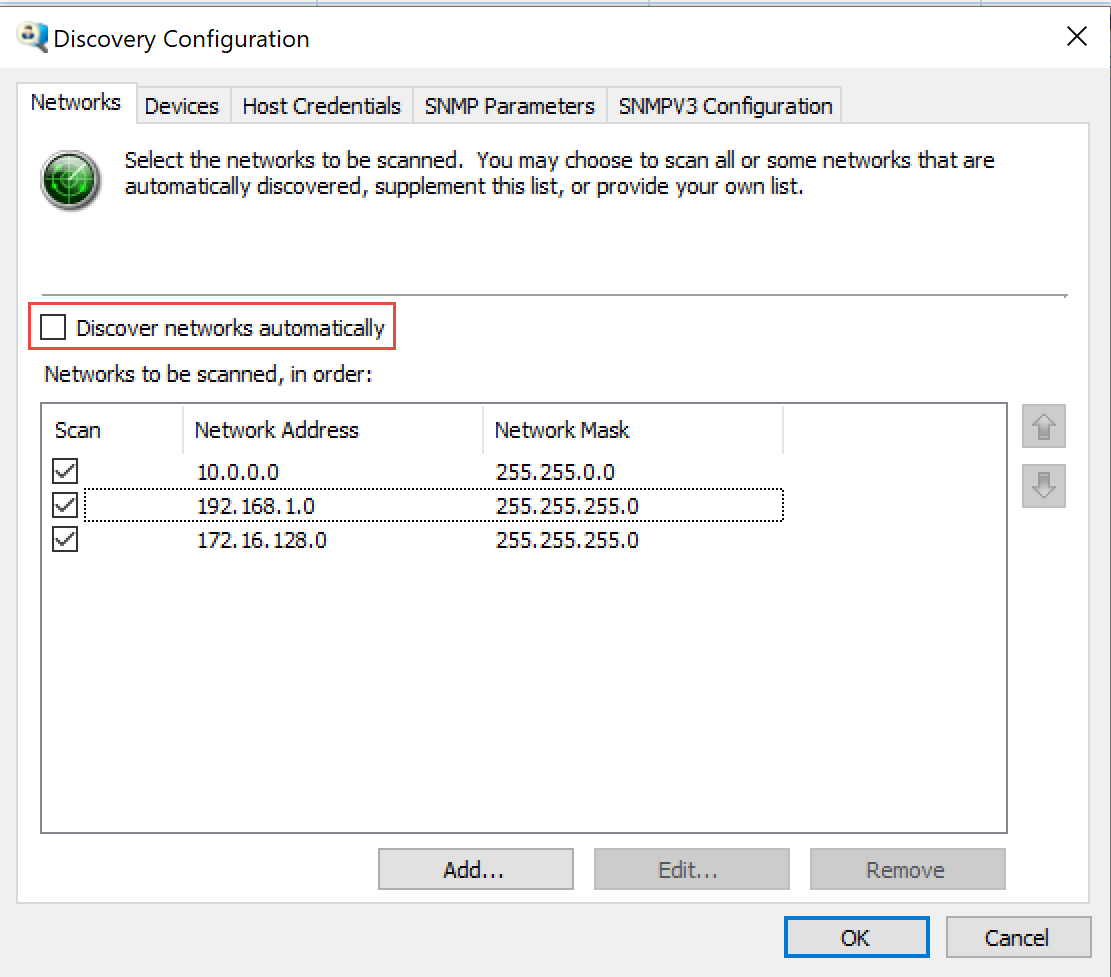
Select Setup > Discovery > Networks, click the Add button and specify each network address and network mask that SiteAudit should scan for printer assets. SiteAudit will contact every IP address specified to discovery printer assets.

|
|
Exclude a network from scanning
|
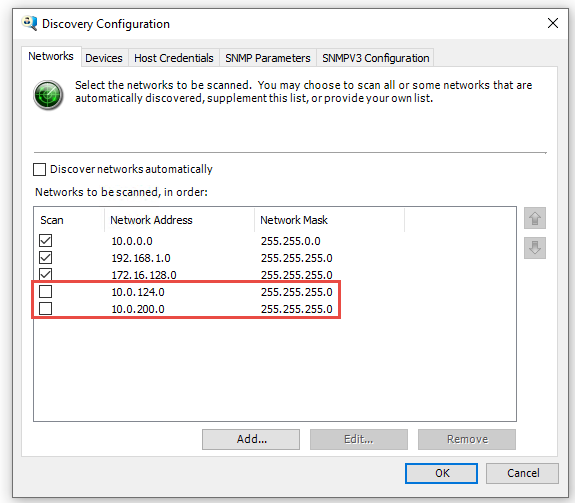
It is best to A network can be excluded from the discovery scan by clearing the Scan checkbox.
|
|
|
|
|
Scan a specified set of devices only
|
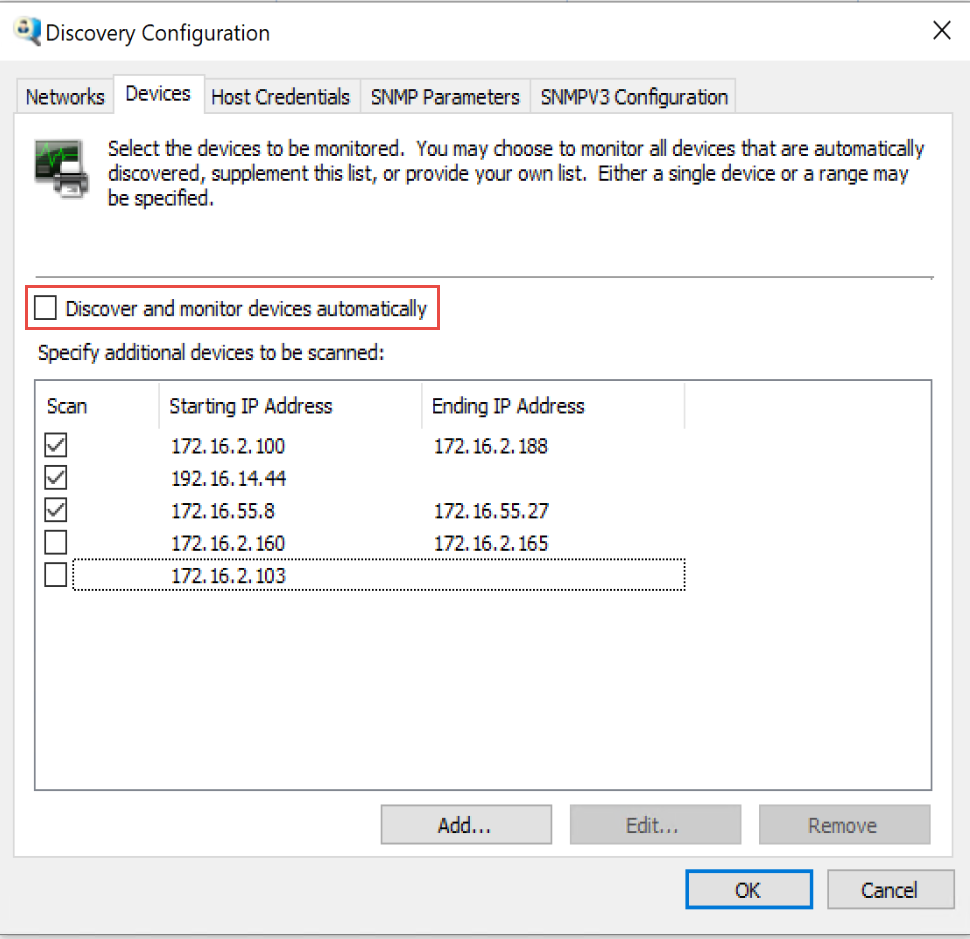
In the Discovery Configuration dialog box,on the Devices tab, clear the Discover and monitor devices automatically check box.
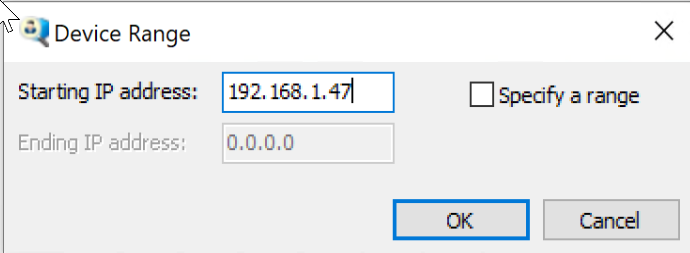
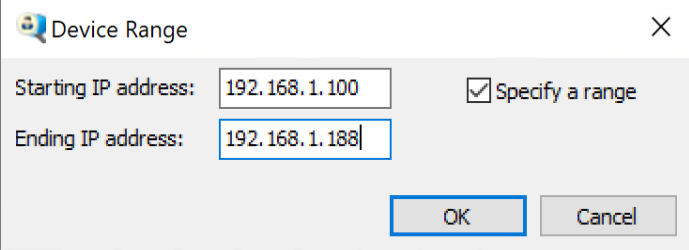
For each device IP address or ranges of addresses that you want to scan, click Add. For an individual address, simply enter that address in the Starting IP address box. For a range, select the Specify a range check box and enter The Starting IP address and Ending IP address (see photo).
If a box is not checked, then the device or the device range will not be discovered or monitored.
|
|
Exclude a set of devices from scanning
|
In the Discovery Configuration dialog box,on the Devices tab, click Add, add an individual IP address or range of IP addresses, and click OK. In the Scan column, clear the check box for that address or range to exclude the devices from scanning.
If a box is not checked, then the device or the device range will not be discovered or monitored.
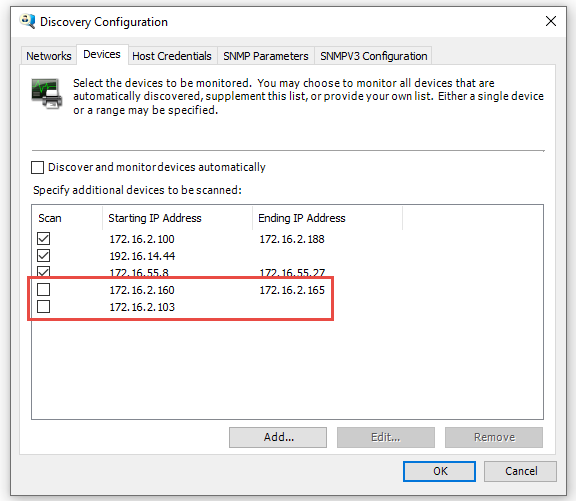
For example:
The range (172.16.2.100 - 172.16.2.188) is checked.
How ever, (172.16.2.160 - 172.16.2.165) is a subset range and is not checked.
Therefore, the range that will be monitored is (172.16.2.100 - 172.16.2.160) and (172.16.2.165 - 172.16.2.188). The subset range will excluded from discovery and monitoring.
|
|
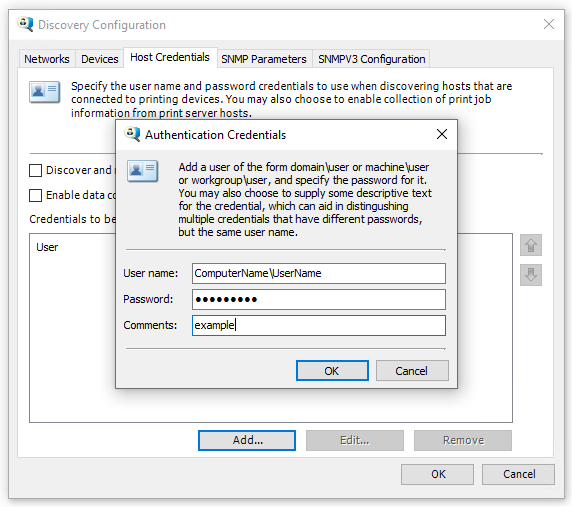
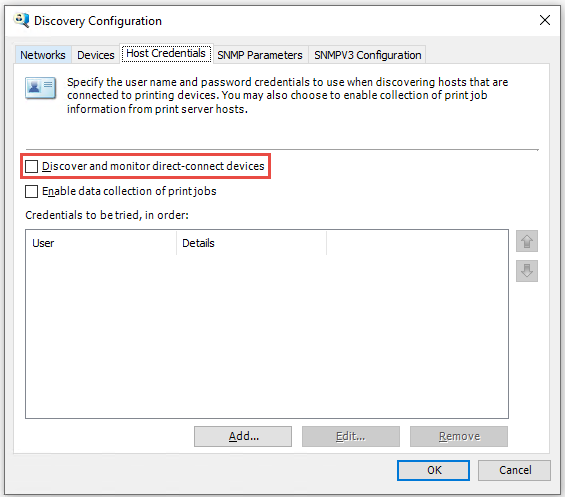
Specify host credentials to be used when discovering host-connected devices
|
In the Discovery Configuration dialog box,on the Host Credentials tab, click Add to enter host user name and password information.
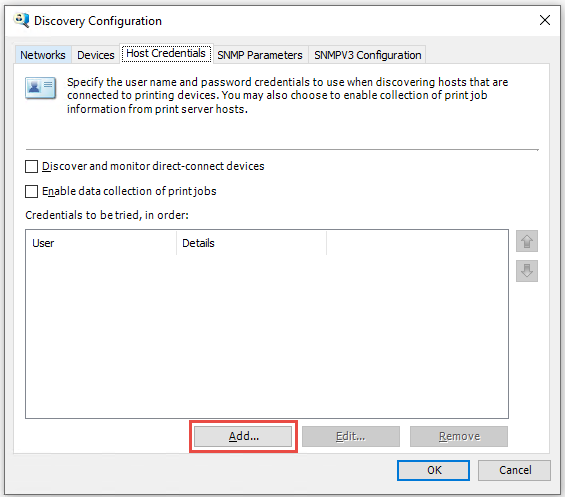
User name: Enter the host name, back slash, then the user name.
Password: Enter the password of the user name.
Comments: adding a comment is optional
|
|
Prevent discovery of locally connected printer
|
In the Discovery Configuration dialog box, on the Host Credentials tab, clear the Discover and monitor direct-connect devices check box.
|
|
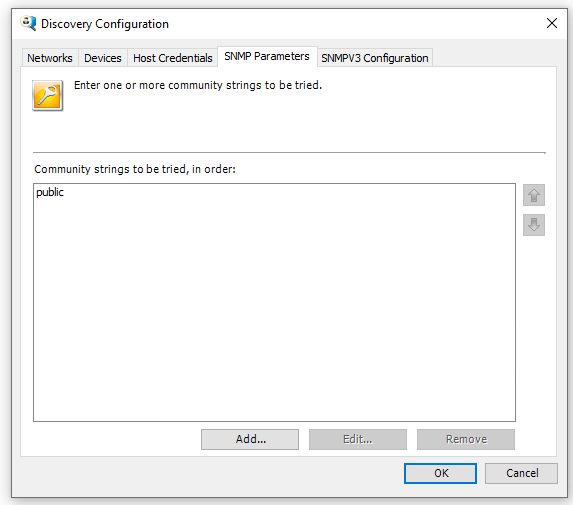
Provide SNMP community strings to be tried
|
In the Discovery Configuration dialog box,on the SNMP Parameters tab, click Add to enter a community string.
|
|
Rearrange the order in which SNMP community strings are tried
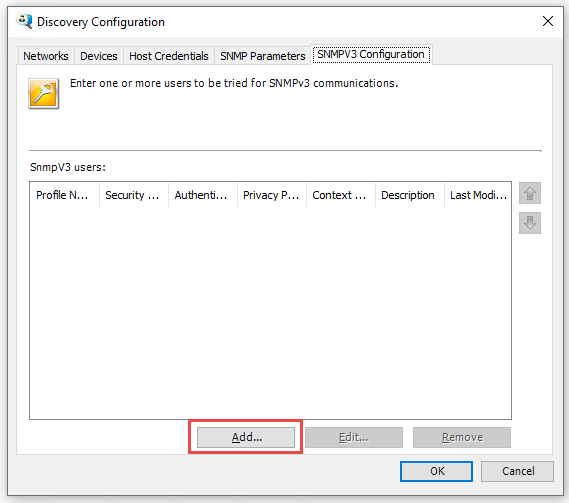
Add SNMPv3 user profiles
|
In the Discovery Configuration dialog box, on the SNMP Parameters tab, select a community string and use the up-arrow or down-arrow button to move the string within the list.
In the Discovery Configuration dialog box, on the SNMPV3 Configuration tab, select add to enter a new user.
|
About Networked Printers
Import Discovery Ranges: To import a range of IP addresses please visit the link Discovery Ranges for instructions
Import Discovery Networks: To import networks please visit the link Discovery Networks for instructions
Import Discovery IP Addresses: To import a list of IP addresses please visit the Discovery IP Addresses for instructions
SiteAudit Technical Support
To receive reseller technical support for SiteAudit:
Email: support@netaphor.com
Please include the person’s name, version (such as 7.5.0.2), a problem title, and a problem description with supporting information.
|
| |
|
